
Installing Buildando and customizing it
You have seen what Buildando is. Now let’s put yours online and make it look like you.
1. Get the template
The template lives at github.com/Buildando/template.buildando.com. There, click “Use this template” → Create a new repository (or fork it). Then clone your repository and install:
git clone https://github.com/YOUR-USER/YOUR-REPO.git
cd YOUR-REPO
npm install
npm run dev      # local server, with hot reload
Open http://localhost:4321 and the blog is already running. Requires Node 22+.
2. The single configuration surface
Almost everything that is “yours” lives in one file: src/config/site.ts.
That is where you edit the name, domain, author, the skin (colors and fonts —
see section 5), social links, navigation, languages, and the integrations
(comments, search, analytics).
export const SITE = {
  name: "My Blog",
  url: "https://my-domain.com",
  author: "Your Name",
  // ...
};
Golden rule: if
buildando, the domain, or the author shows up outside that file, it’s a bug. That is what makes forking so simple.
Swap the assets in public/ too: favicon.svg (the logo) and og-default.svg
(the default social image).
3. The home intro (before the feed)
That block at the top of the home page — the title and welcome line, before the
list of posts — is free-form markdown, one per language, in
src/content/home/:
src/content/home/
  pt.md      ← the Portuguese hero
  en.md      ← the English hero
Edit en.md with whatever you want (title, paragraph, links) — the site’s CSS
handles the looks. Without that file, the home falls back to the site name and
description.
4. The “About the Author” page
The About page lives in src/pages/[lang]/about.astro. The text for each
language sits right at the top of the file — replace it with yours. The menu link
already points at it.
5. Visual identity (skins)
The blog’s looks — light/dark palettes, fonts, and reading width — are a skin:
a preset of tokens in src/config/skins.ts. Switching identity is one line in
site.ts:
export const ACTIVE_SKIN: SkinName = "editorial";Seven of them ship ready:
terminal— the default: dark, blue accent, Inter + Space Groteskeditorial— serif headings, warm paper, green accentmono— monospaced headings, high contrast, amber accentminimal— nearly monochrome, discreet lime accentwarmDev— the Solarized palettebrutalist— radical: hard borders, square corners, offset shadows, violet accentberry— vibrant magenta/pink over a plum base, wider reading column; changes structure (the filter becomes a left sidebar on the home)
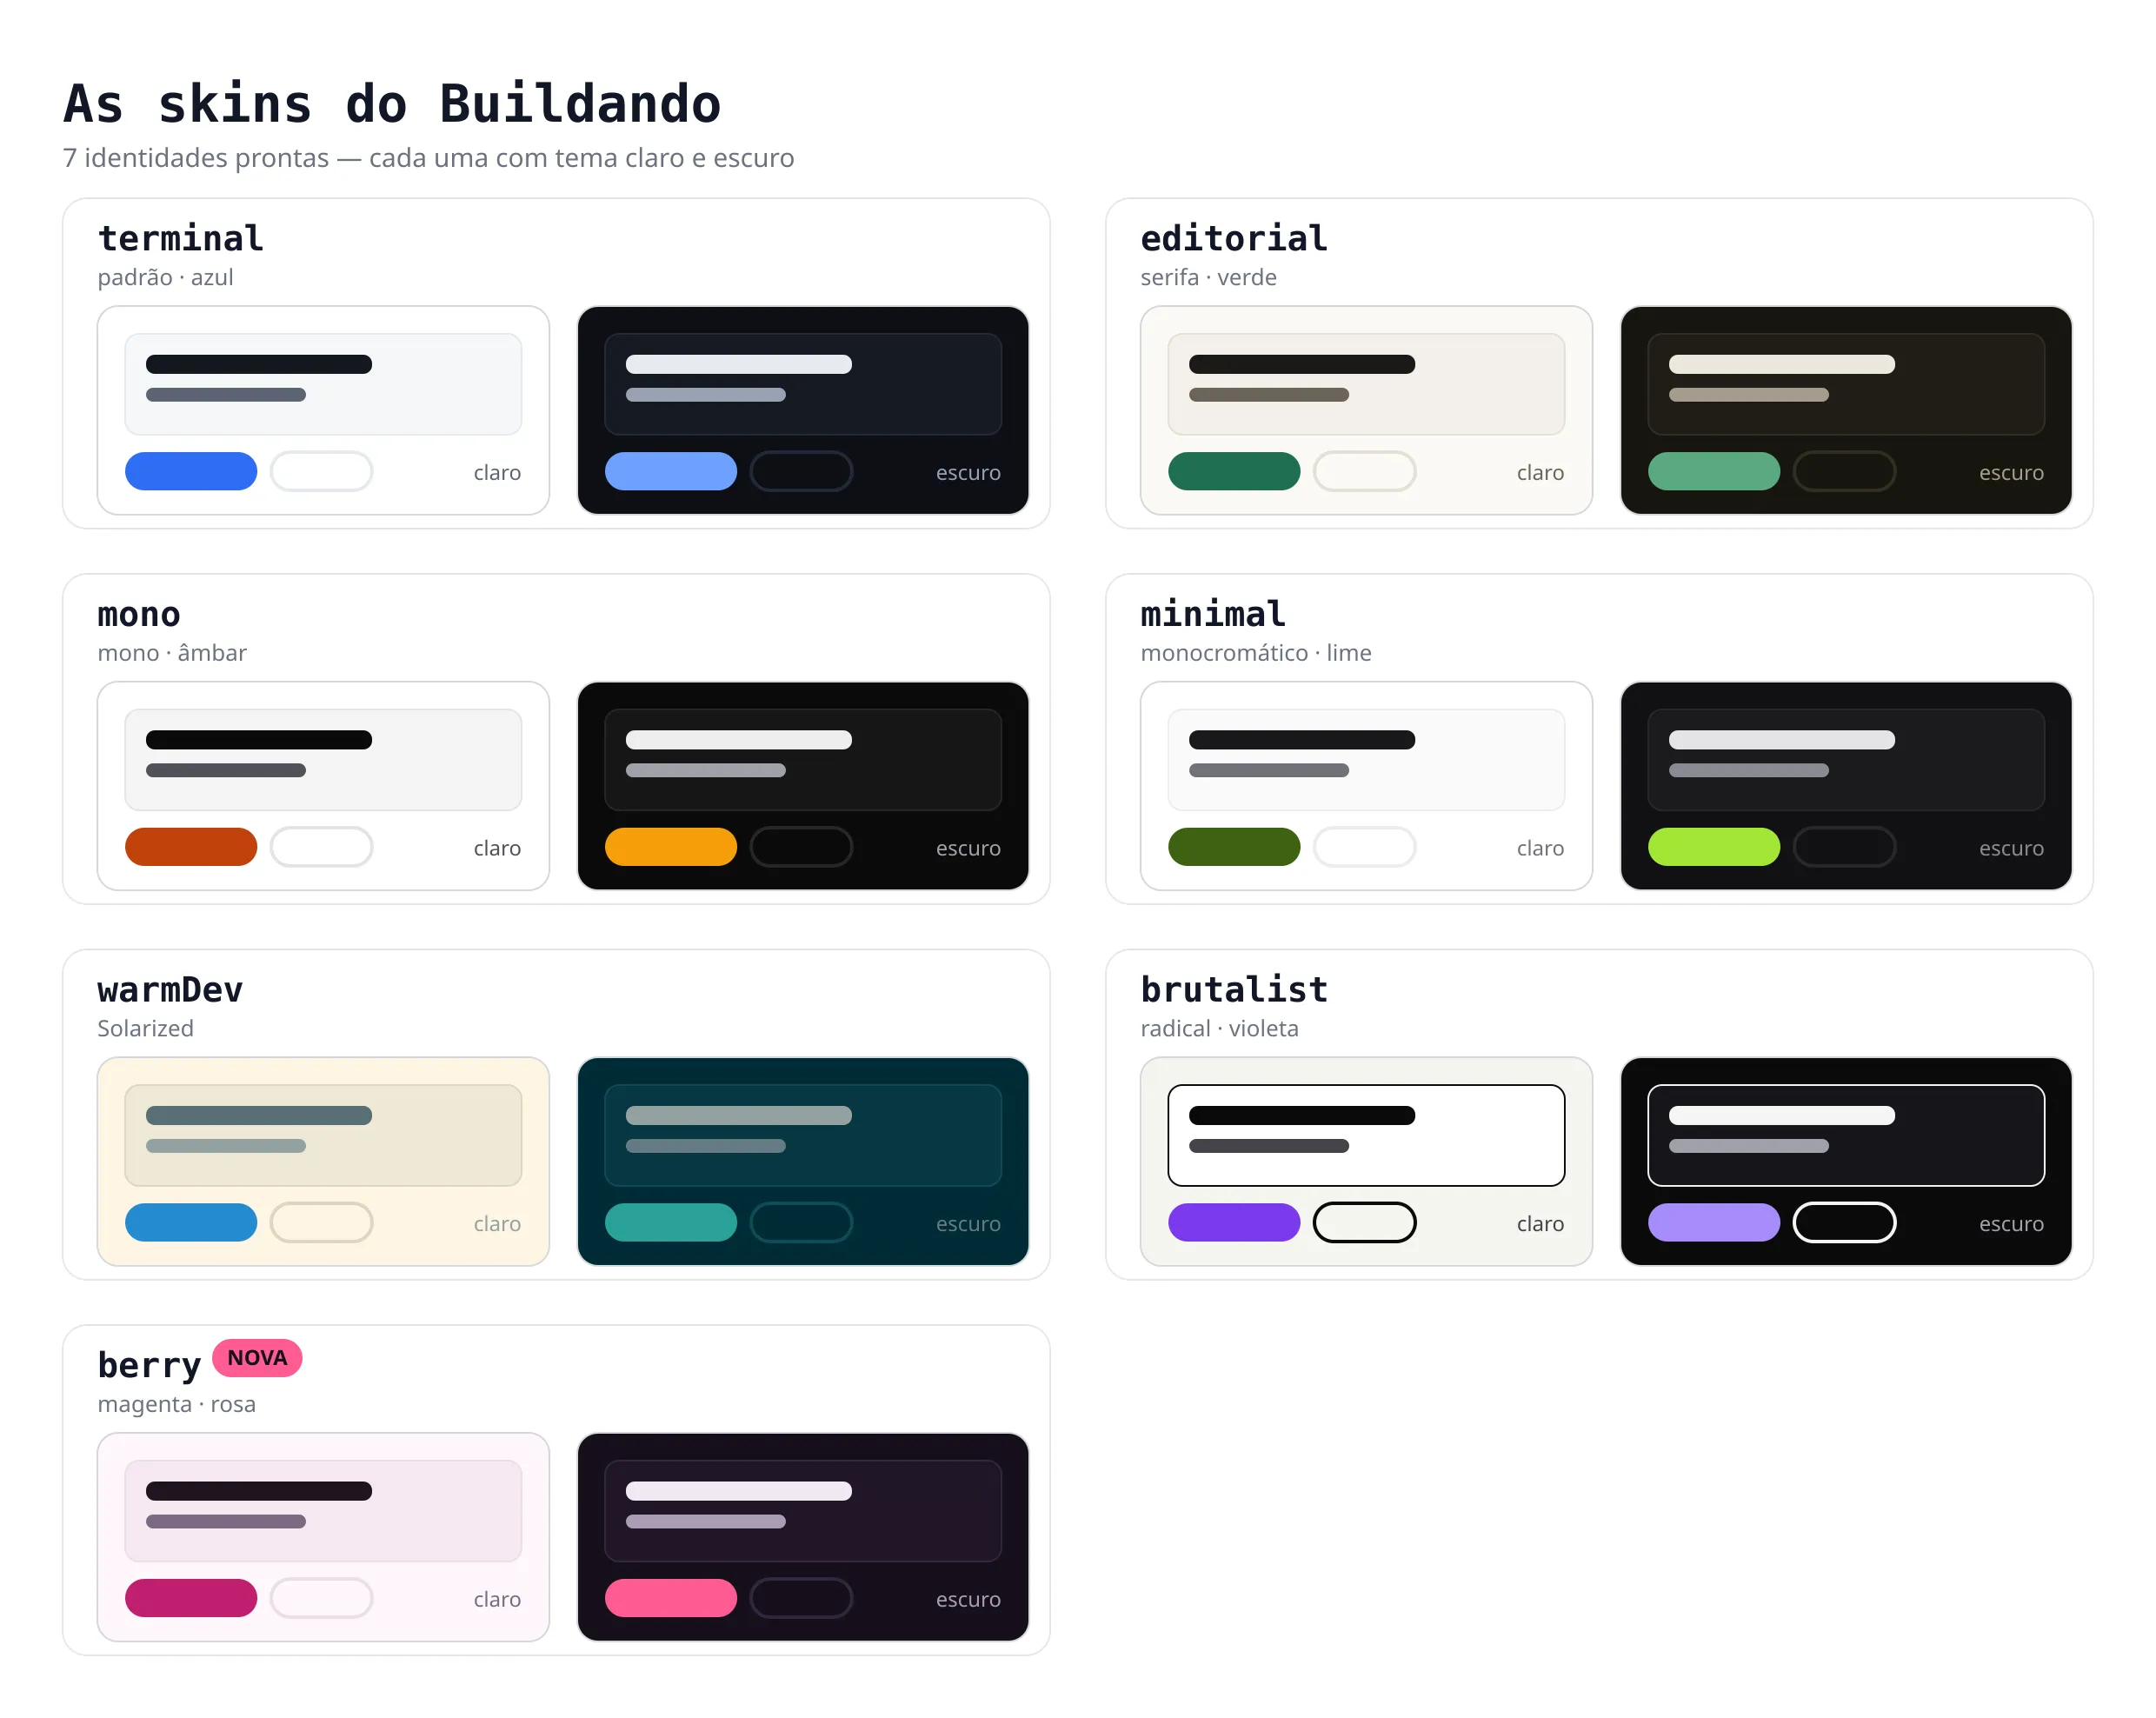
Each comes with light and dark (the theme button toggles). To craft your own,
copy a preset in skins.ts and edit the values — it is plain CSS. A skin can even
change structure, not just color: rules scoped by [data-skin="name"] in
src/styles/skins.css — brutalist and berry are the examples. More in the
Skins section of the README.
6. One language or several
The template ships bilingual (Portuguese and English), but that is configuration,
not structure. The I18N block decides:
export const I18N = {
  defaultLocale: "pt",
  locales: [
    { code: "pt", label: "Português", htmlLang: "pt-BR", ogLocale: "pt_BR" },
    { code: "en", label: "English",   htmlLang: "en",    ogLocale: "en_US" },
  ],
} as const;
To keep a single language, delete the other line. The language switcher
disappears from the header on its own, and URLs stay locale-prefixed (/en/...).
Delete that language’s hero in src/content/home/ and the posts written in it too —
a post whose lang: no longer exists fails the build, naming the post.
To add a language, add a line to locales and translate the strings in
src/i18n/ui.ts. You do not have to guess what is missing: run npm test and
config-integrity.test.ts lists exactly the keys the new language still owes.
Each post declares the language it is written in and links its translations — that belongs to writing posts. What matters here is that nothing forces you to translate everything: an untranslated post stays reachable under the other languages, with the interface translated and the body in its original language.
7. Logo, favicon and social images
Three files and one field:
public/favicon.svg      ← header logo AND browser-tab icon
public/og-default.svg   ← social image for pages with none of their own
src/assets/author.jpg   ← the photo on the About page
The header logo comes from SITE.logo, which points at /favicon.svg — replace the
file keeping the name, or change the field. Being SVG, it stays sharp at any size and
weighs nothing.
Posts need no image: one without a cover automatically gets a social card generated
at build, carrying your brand and the skin’s colors.
8. Social links and sharing
Two different blocks. SOCIAL is your own profiles, rendered as footer icons:
export const SOCIAL = [
  { label: "GitHub", href: "https://github.com/your-user", icon: "github" },
  { label: "LinkedIn", href: "https://linkedin.com/in/you", icon: "linkedin" },
] as const;
icon is a simple-icons slug. Ready to use: github,
instagram, threads, x, tiktok, facebook, linkedin, youtube, telegram,
whatsapp and rss. An unknown slug simply draws nothing — to add another, edit
src/components/Icon.astro. An empty list means a footer without icons.
SHARE is a different thing: the share buttons at the foot of each post.
export const SHARE = {
  networks: ["x", "whatsapp", "telegram", "linkedin", "facebook"],
  copyLink: true,   // copy-link button
  native: true,     // the phone's own share sheet, where available
} as const;
9. Turning integrations on
Every integration is opt-in and empty means off: the template as you cloned it makes not one third-party request. Turn on only what you use — and each one you turn on changes what the privacy policy declares, on its own.
9.1 Comments with GitHub Discussions (giscus)
giscus renders a GitHub discussion inside the post. There is no database: the comments live on GitHub.
- Create a public repository just for comments — say
your-user/my-blog-comments. It has to be public, but the blog’s own repository can stay private: they are separate things, which is the reason to dedicate one. - In that repository, go to Settings → General → Features and tick Discussions.
- Install the giscus app on it: github.com/apps/giscus.
- Open giscus.app and enter
owner/repository. The page checks the three prerequisites above and, if they hold, hands yourepoIdandcategoryId— pick the Announcements category, which is announcement-only and stops anyone opening loose threads. - Paste into the
GISCUSblock:
export const GISCUS = {
  repo: "your-user/my-blog-comments",
  repoId: "R_kg...",
  category: "Announcements",
  categoryId: "DIC_kw...",
  mapping: "pathname",   // each post URL maps to a discussion
  theme: "site",
} as const;
mapping: "pathname" ties a post to its discussion by URL path. Which means
renaming a post’s folder orphans its comments — the old discussion stays there,
pointing at an address that no longer exists.
Leave theme: "site" so the comments follow the blog’s theme button. giscus’s own
default, preferred_color_scheme, follows the operating system: a reader who puts
the site in light mode while their OS is dark gets dark comments in the middle of a
light page.
While repoId is empty the whole section is not rendered — no heading, no script, no
request.
9.2 Google Analytics
Of the snippet Google hands you, the blog needs one thing: the measurement id.
- In Google Analytics, create a GA4 property and a data stream for your domain. It
gives you an id shaped
G-XXXXXXXXXX. - Paste it into the config:
ANALYTICS.googleAnalytics = "G-XXXXXXXXXX";Do not paste the <script>: the blog emits the very same gtag calls, only after
consent. Turning GA on lights up three things at once:
- the cookie banner starts appearing;
- the privacy policy gains its Google Analytics section;
- the footer gains Cookie preferences, for readers who change their mind.
So fill the CONSENT block along with it (section 9.5). To check it is right, read
the published HTML: there must be no <script src="...googletagmanager..."> on the
page — the address appears only inside the consent queue.
Plausible is the cookieless alternative: ANALYTICS.plausible = "your-domain.com".
Setting no cookie, it triggers no banner.
9.3 AdSense
Only worth doing once AdSense has approved your site — approval looks at volume and originality, and a fresh blog usually waits.
Three pieces, in three different places:
- The publisher id, in the config:
ANALYTICS.adsense = "ca-pub-0000000000000000";ads.txt, at the site root. Createpublic/ads.txtwith the exact line AdSense gives you — everything inpublic/lands at the domain root, which is where Google looks:
google.com, pub-0000000000000000, DIRECT, f08c47fec0942fa0- The formats, in the AdSense dashboard, under Ads → By site. Without that step the script loads and no ad appears — a symptom indistinguishable from a bug.
The account-verification meta tag needs no pasting: it is emitted from the publisher id. And since all advertising sits behind consent, readers who decline see no ads — correct behaviour, and less revenue than the dashboard projects.
Automatic formats let Google decide where to insert, including between paragraphs and
pinned to the bottom. To decide yourself, place src/components/AdUnit.astro with a
slot created in the dashboard — no page uses it by default.
9.4 Newsletter
First, a confusion that costs time: RSS does not send email. The feed is a file the site publishes; what reads it is a feed reader. Reaching an inbox takes a provider in between, and that provider is what turns “a new post is out” into a message.
Pick a provider with RSS-to-email. Mind the plan: several charge for precisely that automation, even with a handful of subscribers. Worth checking before signing up.
Create one list per language. The feed is per language, so a list fed from it is too — someone subscribing in English should not receive Portuguese posts.
Take the real form fields, not the iframe. This is where it is easy to go wrong: providers offer an iframe or a ready-made link, but what you need is the HTML form. If only the link exists, open the hosted form page and read its HTML — the three things that matter are there:
- the
action(where the form posts); - the name of the email field, often not
email(Brevo usesEMAIL); - the hidden fields, including the anti-bot honeypot — a field that must be submitted empty.
Posting without them is the worst kind of failure: the provider accepts the request and subscribes nobody. The form looks like it works.
export const NEWSLETTER = {
  actionUrl: {
    pt: "https://provider.example/serve/AAA",
    en: "https://provider.example/serve/BBB",
  },
  emailField: "EMAIL",
  hiddenFields: {
    pt: { locale: "pt", email_address_check: "" },
    en: { locale: "en", email_address_check: "" },
  },
} as const;
A language with no endpoint simply shows no form — better no form than the wrong list.
Close the loop in the dashboard: create one RSS-to-email integration per list,
pointing at the matching feed (/pt/rss.xml, /en/rss.xml). From then on, publishing
a post sends the email by itself. Two things to watch on the first run: many providers
pull several items at once and your feed already has posts — check how many it intends
to send before letting it go; and there is usually a window of about an hour between
publishing and sending.
With JavaScript the submission happens in the background and the reader stays on the page; without it, the form posts normally. No subscriber data touches your site.
9.5 Consent and the privacy policy
This block turns nothing on — it governs what the others oblige:
export const CONSENT = {
  required: true,
  privacyUrl: "/privacy",
  contact: "privacy@your-domain.com",
} as const;
contact is the address the policy offers for data-subject requests. Create the
mailbox before publishing: a policy pointing at an address that does not exist is
worse than no address at all.
The privacy page assembles itself from the configuration. You neither write nor maintain that text: with Google Analytics on, its section appears; with a newsletter in that language, the newsletter section appears; with no ads, the sentence mentioning them goes away. And when nothing is on — no analytics, no ads, no comments embed, no signup form — there is no privacy page, no footer link and no banner: a blog that collects nothing has nothing to declare.
Do read the page once everything is configured. It describes what the site really does, but you are the one answering for the text.
9.6 Search
Nothing to configure beyond on or off: INTEGRATIONS.search = "pagefind" or "none".
The index is built at build time, split by language, and runs in the browser — there
is no search server to keep.
10. RSS
Nothing to configure: the feed is generated on its own, one per language, at
/pt/rss.xml and /en/rss.xml. It is already announced in the <head> of every
page, so feed readers find it by themselves, and there is an icon in the footer.
Title, description and domain come from SITE — changing your identity in step 2
already fixes the feed.
Drafts never reach the feed.
11. Publishing
npm run build produces the static dist/ folder, which runs on any host:
object storage, a CDN, a static host, or classic shared hosting.
The template ships no deploy workflow, deliberately: automation belongs to a
concrete site, with its own host and credentials, and a workflow that cannot run is
a red CI badge on every fork before it has decided anything. Once you have hosting,
the Deploying section of the README covers the two transports that fit shared
hosting — rsync over SSH and FTPS — with the traps of each.
Before publishing, npm test is worth the minute it takes: besides checking the
build, it verifies that your configuration hangs together — a language without its
translations, a skin that does not exist, consent switched off while analytics is on.
There you go — the skeleton is yours. The next step is the one that matters most: writing posts.